
Accessing Shared Resources Effortlessly: A Guide to Mapping Network Drives in Windows 7
Related Articles: Accessing Shared Resources Effortlessly: A Guide to Mapping Network Drives in Windows 7
Introduction
In this auspicious occasion, we are delighted to delve into the intriguing topic related to Accessing Shared Resources Effortlessly: A Guide to Mapping Network Drives in Windows 7. Let’s weave interesting information and offer fresh perspectives to the readers.
Table of Content
Accessing Shared Resources Effortlessly: A Guide to Mapping Network Drives in Windows 7
In the realm of computer networking, seamless access to shared resources is paramount. Whether it’s accessing files on a server, collaborating on documents with colleagues, or simply storing data in a centralized location, the ability to connect to remote drives efficiently is crucial. Windows 7 provides a straightforward and powerful mechanism for achieving this: mapping network drives.
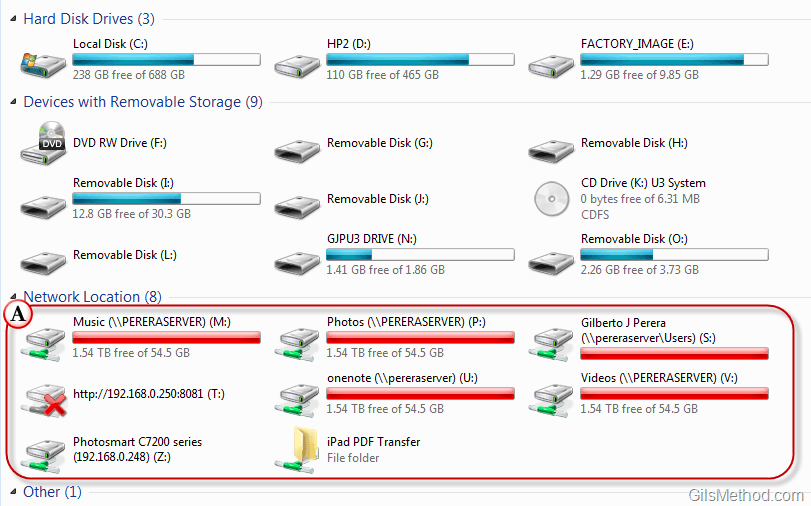
Mapping a network drive essentially creates a virtual connection between your local computer and a shared folder or drive on another computer or network device. This virtual connection appears as a standard drive letter within your Windows Explorer, allowing you to browse, access, and manage files on the remote resource as if it were a local drive.
Why Map Network Drives?
Mapping network drives offers several advantages that streamline network interactions and enhance user experience:
- Simplified Access: Instead of navigating complex network paths, users can access shared resources with a single click by opening the mapped drive in Windows Explorer. This eliminates the need to remember lengthy network addresses or navigate through multiple folders.
- Centralized Storage: Mapping drives provides a convenient way to access shared files and folders from a central location. This is particularly useful for teams collaborating on projects, as it allows everyone to access the same data from their individual workstations.
- Enhanced Security: By mapping drives, users can leverage the security settings of the shared resource, ensuring only authorized individuals have access to sensitive information. This helps maintain data integrity and confidentiality.
- Increased Productivity: By eliminating the need to manually browse network paths, mapping drives allows users to focus on their tasks instead of navigating through folders. This can significantly improve productivity and reduce time spent on file management.
- Improved Data Organization: Mapping drives allows for a more organized approach to storing and managing files. Users can create dedicated drives for specific projects, teams, or types of data, making it easier to find and manage files.
Mapping Network Drives in Windows 7: A Step-by-Step Guide
Mapping a network drive in Windows 7 is a simple process that can be accomplished through the following steps:
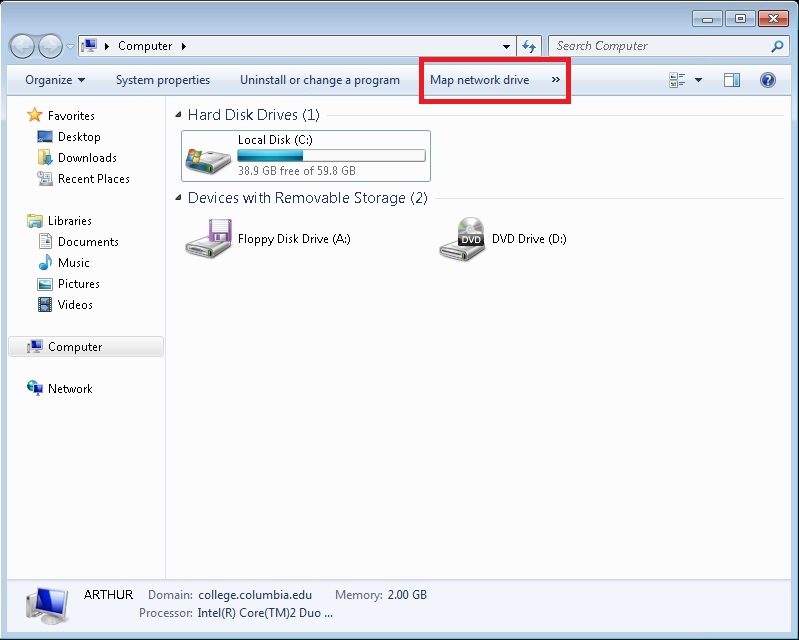
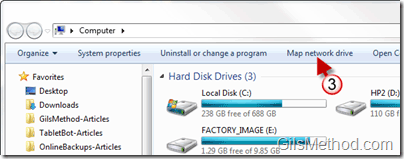
- Open My Computer: Navigate to the "Computer" or "My Computer" icon on your desktop or in the Start menu.
- Locate the "Map Network Drive" Option: In the "Computer" window, locate the "Map Network Drive" option under the "Tools" menu. Alternatively, you can right-click anywhere within the window and select "Map Network Drive" from the context menu.
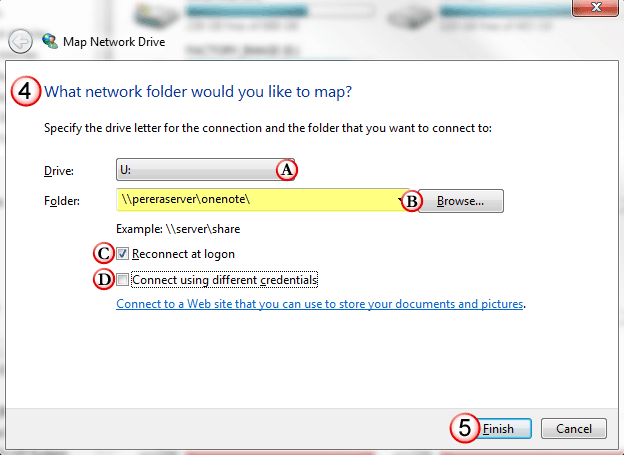
- Enter the Drive Letter and Network Path: In the "Map Network Drive" dialog box, select a drive letter for the mapped drive. This letter must be unique and not already assigned to another drive. Then, enter the network path of the shared resource. This path typically begins with "" followed by the name of the computer or network device, followed by the shared folder name. For example, "serversharedfolder".
- Choose Connection Options: The "Map Network Drive" dialog box also allows you to specify connection options. You can choose to connect to the shared resource every time you log in, or you can manually connect to it later. You can also choose whether to reconnect to the shared resource if the connection is interrupted.
- Finish the Mapping Process: Once you have entered the necessary information, click "Finish" to complete the mapping process.
Troubleshooting Common Issues:
While mapping network drives is generally straightforward, users may encounter some common issues:
- Incorrect Network Path: Ensure you have entered the correct network path for the shared resource. Double-check the computer name, shared folder name, and any other relevant information.
- Access Permissions: Make sure you have the necessary permissions to access the shared resource. Contact the network administrator if you are unable to access the shared resource.
- Network Connectivity Issues: Verify that your computer is connected to the network and that the network connection is stable.
- Drive Letter Conflicts: Ensure that the chosen drive letter is not already assigned to another drive on your computer.
- Firewall Restrictions: Check if your firewall is blocking the connection to the shared resource. You may need to configure your firewall settings to allow access.
Frequently Asked Questions:
1. Can I map a drive to a folder on my own computer?
No, mapping drives is primarily intended for accessing shared resources on other computers or network devices. You cannot map a drive to a folder on your own computer.
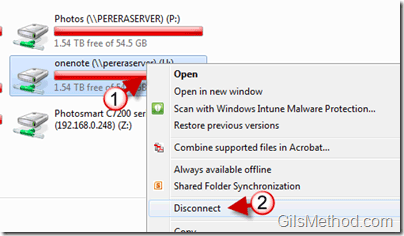
2. How do I unmap a network drive?
To unmap a network drive, simply right-click on the drive letter in Windows Explorer and select "Disconnect". You can also use the "Map Network Drive" dialog box to unmap a drive by selecting the drive letter and clicking "Disconnect".
3. What happens to my mapped drives when I log out or shut down my computer?
The behavior of mapped drives depends on the connection options you selected during the mapping process. If you chose to connect to the shared resource every time you log in, the drive will be disconnected when you log out or shut down your computer. If you chose to reconnect to the shared resource if the connection is interrupted, the drive will be automatically reconnected when you log back in or restart your computer.
4. Can I map a drive to a resource on a different network?
Yes, you can map a drive to a resource on a different network, but you may need to configure your network settings to allow access. Consult with your network administrator for assistance.
5. What are the security implications of mapping network drives?
Mapping network drives can expose your computer to security risks if the shared resource is not properly secured. Ensure that the shared resource is protected with strong passwords and access controls.
Tips for Optimal Network Drive Management:
- Choose Descriptive Drive Letters: When mapping drives, select drive letters that are easy to remember and reflect the purpose of the shared resource.
- Use Network Credentials: If the shared resource requires authentication, use strong passwords and store your network credentials securely.
- Regularly Check Connection Status: Monitor the connection status of your mapped drives to ensure they are functioning correctly.
- Disconnect Drives When Not in Use: Disconnect mapped drives when you are not using them to minimize security risks and improve performance.
- Consider Using a Network Drive Manager: Network drive management tools can help you streamline the process of mapping, unmapping, and managing network drives.
Conclusion:
Mapping network drives is an essential tool for accessing shared resources in Windows 7. By providing a simple and efficient way to connect to remote drives, it enhances user productivity, improves data organization, and strengthens network collaboration. Understanding the benefits, processes, and potential issues associated with mapping network drives empowers users to leverage this powerful feature effectively.


Closure
Thus, we hope this article has provided valuable insights into Accessing Shared Resources Effortlessly: A Guide to Mapping Network Drives in Windows 7. We hope you find this article informative and beneficial. See you in our next article!